Claire's had nail art kits of all kinds. Tiny brushes for people painting their own designs, stickers and stamps and stencils for people who want a shortcut, and also various "wheels" of 100-150 tiny shiny pieces of assorted plastic. The one I got was similar to this one, although the pack I got was being discontinued, so it was slightly different colours than the one I've linked (it was also reduced to £1.50).
You put on nail polish, then while it's still sticky you use tweezers to place a tiny shiny piece of plastic in the desired spot on your nail and tap it down. Then you put on a layer of clear topcoat (a bottle of which was £3) to seal it in place. Total cost came in under £5, which is acceptable for an experiment, especially if the quantities are such that if it works out well you can repeat it.
I did the dishes, and I went to the loo (you should always do both of these things before trying to apply nail polish), then fired up a mouse-only computer game to play during drying-time and started painting.
Getting the tiny shiny pieces of plastic on was a lot easier than I thought it would be. It's definitely a tweezers job, but it turns out that in relation to a fingernail the pieces of plastic aren't so tiny after all.
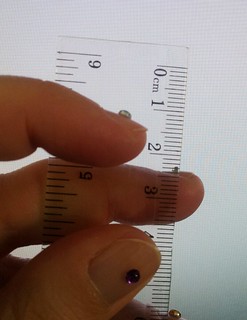
As you can see, they're only a millimetre or so but they're still quite a significant lump. I figured that despite the hour they'd had for drying, they would come off within minutes of actually doing anything, but that it had been a fun experiment.
I scooped wet laundry out of the washing machine. I could feel the bumps being knocked by the fabric, but they stayed on.
I pegged some laundry out, carefully. The bumps snagged against the clothespegs and I dropped a couple of them, but the dots stayed in place.
Then it started to rain, so I scooped the laundry in as quickly as I could. I felt certain that the rush and the lack of attention would mean I'd lost at least one tiny shiny piece of plastic... nope, still there.
I went to the loo, which means buttons and zips and enemies of a manicure, but the dots survived, and they also survived the washing and towel-drying of hands.
I went for tea and cake with a friend. I could feel it every time the dots knocked against the cup or the teapot but they weren't going anywhere. They didn't mind me putting my coat on or taking it off, or fishing in my handbag for my phone/purse/tablets/etc.
I did some knitting and while I could feel the dots getting gently caught in the holes of the lace stitches, they're smooth and didn't snag. By this point I was really starting to love them.
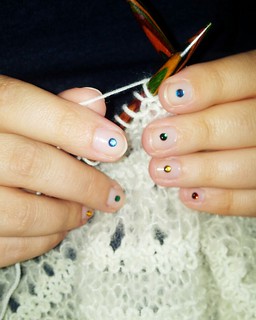
We went for dinner with a couple of friends and I happily showed off my nails. We speculated about how many out of the ten tiny shiny pieces of plastic would be lost in the bed come morning. With the best will in the world, even I expected to lose at least one.
Wrong. All ten were still present and correct when I woke up and have also withstood showering, drying, and getting dressed, although in the interests of a full disclosure I should admit I didn't wash my hair.
There's a bit of me wondering if they might even survive until I meet up with a friend for knitting on Tuesday. And if not, then unlike the salon version I can repair it myself, since I still have more than a hundred tiny shiny pieces of plastic and an almost-full bottle of topcoat.


