This morning, I saw Carie's confirmation that I'd got the right idea for how to follow the instructions for the heel flap and verily I did rejoice, because Carie knows her sockage.
Alas, as my knitting speed increases, my sense of accomplishment becomes short-lived. It's taken less than a day to reach the end of that set of instructions and now I am perplexed.
The pattern does have a copyright bit on it, which I respect and I promise I am trying to not type out the whole thing in daily instalments on my blog. The trouble is that I have nobody in a 15-mile radius who I know who can do socks. The local yarn store is beyond rubbish. The nearest knitting group is Norwich (or, as I keep getting told everywhere I enquire, there is a cross-stitch group once a month in Beccles (ten miles from here and about 2 buses a year) which I might enjoy - however I doubt they know socks either). So I must ask internet peoples for help. But, in order for internet peoples to help me, internet peoples must know what it is I am actually trying to do.
Instructions are as follows:
1st Row: Slip first st, P16 (half stitches plus 2 on right needle), P2tog, P1, turn.
2nd Row: Slip first st, K5, ssk2tog, K1, turn.
3rd Row: Slip first st, P6, P2tog, P1, turn.
4th Row: Slip first st, K7, ssk2tog, K1, turn.
Continue in this way taking in one more stitch each row until all the heel flap stitches have been included.
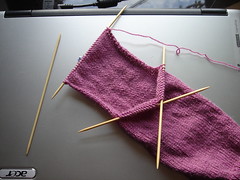
Looking at the photo... Needle 1 is empty. Needle 2 has 30 sts on it. Needles 3 and 4 each have 15 sts on them. Total, 60 sts. If you click the photo, you'll go to it in my flickr stream where it is labelled with notes. Feel free to add to those notes.
I do not even begin to understand. Well, I understand "k" and "p" and "slip," and I even understand "P2tog" and "ssk2tog", more or less. But I can't seem to put it in any sort of context. Where do I start? Which needle? Which direction? How does one "include" the heel flap stitches? Does "heel flap stitches" mean the 30 sts on needle 2, or the stitches going down the sides of the heel flap, or the stitches on needles 3 and 4, or what?
The upside of all of this is that the jumper - the nice, simple, chunky yarn, chunky needles, small person sized jumper - is coming along nicely even if it does dye my hands blue.
edited 21/08/07 to add tags
Wednesday, August 15, 2007
Subscribe to:
Post Comments (Atom)


3 comments:
Fear not - help is at hand.
Right then ... having done your heel flap you need to actually turn the heel before you can join everything back up into a big circle again.
For this step ignore the stitches on needles 3 and 4 (the ones that are the front of your foot). Hold the knitting with the wrong side facing you. You are still working back and forth for a bit.
Row 1: slip 1 st as if you were going to purl it, then purl however many you need (16) so that the final number of sts on the needle in your right hand is 17 (ie half the sts that you had in total (15) plus 2). Then p2tog and then p1. That is all the knitting you do on that row, just leave the rest of the sts and turn the knitting around so that the right side is now facing you (still ignoring needles 3 and 4).
Now, starting right where you are, half way through a row, sl 1 st as if to knit, knit 5, ssk, knit1. You will again finish part way through the row at which point you turn the knitting to work a purl row.
Imagine that your last row of the heel flap is a row of green stitches. You have now worked some of the green sts in the middle of the row but lots on the side are still original green sts on the needle. If you could see your needles in Carie-colour at this point the row would read green sts, lilac sts, green sts. As you complete each row of the heel turn you use one more "green" stitches by increasing the number of sts that you knit or purl in between your sl1 at the beginning and your ssk or p2tog at the end.
Alternatively, think of the sl 1 and the work 2 tog as a set of brackets. Each row, increase the number of sts between the brackets by 1.
Visually you are working an inverted triangle onto the end of the heel flap (working point to base) which will pull your heel flap around the back of your heel.
I'm sure I've only added to the confusion but I can't find any photos to demonstrate what I mean. Next time I reach a heel flap I'll take piccies and put them on my blog if you're still stuck
You are too good to me.
That does make sense, although I'm not going to attempt it this minute (can't sleep but am very tired), but if it makes sense now it should morning make sense too. My esteemed friend Dominocat, who is pretty much responsible for me knitting starting in the first place, has added a comment to my photo's flickr page with also pictures make good understandyness.
(Forgive bad English.)
Morning re-read: you still make sense. I don't.
Post a Comment